

OpenCV color detection and filtering is an excellent place to start OpenCV Python development. In this article, I introduce a basic Python program to get started with OpenCV. The program will allow the user to experiment with colour filtering and detection routines. This article marks the beginning of my efforts to create an object detection robot.
OpenCV (Open Source Computer Vision Library) is used to filter images taken from either a video stream, video files or image files. While using a supported programming language, you can create a program to use a camera, as a sensor, to detect and track elements within an image. If you can isolate elements within an image, you can detect and track the elements within video streams.
2018 Pi Wars 4.0
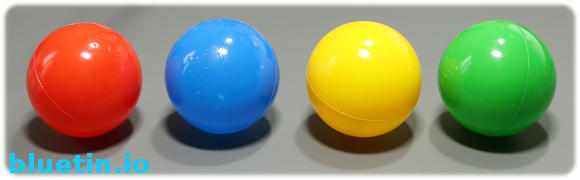
I’ve been interested in OpenCV for a few years now, but I have not made good use of it until now. My latest motivation to work with OpenCV is the most recent Pi Wars competition. One of the challenges in the tournament is called Somewhere Over The Rainbow. This challenge requires the competing robot to detect four balls in four different colours (Red, Blue, Yellow and Green). The robot has to drive up to each ball in a specific colour order to complete the challenge for the best points available.
So, to do some work towards being able to compete in the Somewhere Over The Rainbow challenge, I am going to see what it takes to detect the four different colours. Therefore, OpenCV color detection is a good starting point to recognise the four colours of interest – Red, Blue, Yellow and Green.
OpenCV Color Detection
OpenCV color detection is just a starting point. The ultimate goal is to eventually locate the coloured element position within a video stream frame using Python 3 code. So, if I can isolate and track the element in the video stream, I can set a waypoint for the robot to drive to for example.
Installing OpenCV
To run the OpenCV color detection example Python program, you will have to install OpenCV on either Raspberry Pi or Windows OS.
Raspberry Pi
To quickly install OpenCV on to the Raspberry Pi, you can follow this article to install OpenCV from a shell script file. You can download and start the shell script to install OpenCV and all the dependencies in one go.

Install OpenCV onto Raspberry Pi from Shell Script – Link.
Windows 10
If you are interested in running OpenCV on Windows 10, you will need to install Python. Then, using the Python pip package manager, install Numpy and OpenCV libraries. I believe Python includes the pip package manager with Windows Python installation.
- Download and install the latest Python 3 software for Windows.
- Then install the packages below in the Windows command prompt:
pip3 install numpy
pip3 install opencv-python
The Idle application should now be available to run and edit Python code in Windows.
OpenCV Color Detection Example Code
Two versions of OpenCV color detection Python 3 code examples are available from my GitHub. The only difference between them is the type of media that they open. So, one Python code example opens an image file while the other opens a video stream. However, if you are running Linux or Raspberry Pi in a virtual machine environment, like the one featured in this post, you might only be able to open image or video files.
Raspberry Pi Camera
For my purpose and example code compatibility, I am using a cheap USB Raspberry Pi compatible webcam from Banggood (Product ID: 1023048). The webcam, costing 5.10 British Pound (US$6.67), is a lot more robust with longer cable compared with the Raspberry Pi camera.
However, if you want to use the Raspberry Pi camera with the code examples below, check the resources below for the link to a guide. The guide will explain how to use the Raspberry Pi camera in OpenCV.
How The Example Python Program Works
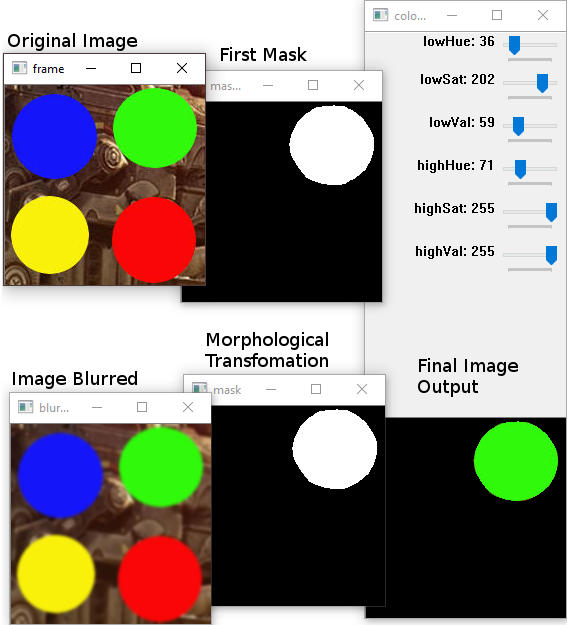
Run the code below with the Python Idle application on either the Raspberry Pi or the Windows desktop. The windows should appear on the desktop like in the above image. You can operate the HSV (Hue, Saturation, Value) sliders to isolate the colour you want to detect in the image.
When using the GUI sliders to define a new colour, first reset the sliders. Hence the top three sliders go to zero; the bottom three go to 255. The low and high Hue values should be changed first to lock in the desired colour. Then adjust low Saturation and Value to fine tune.

The range of HSV values between low and high selected will be used to create a mask around the colour profile to be detected. Try different images to get a better sense of what the challenges are to isolate various colours.
Check under Resources below for GitHub links to both versions of this code and the test image.
The OpenCV Color Detection Code
#!/usr/bin/env python3 """ File: opencv-open-file-color-test.py This Python 3 code is published in relation to the article below:OpenCV Color Detection and Filtering with PythonWebsite: www.bluetin.io Author: Mark Heywood Date: 8/12/2017 Version 0.1.0 License: MIT """ from __future__ import division import cv2 import numpy as np def nothing(*arg): pass # Initial HSV GUI slider values to load on program start. icol = (36, 202, 59, 71, 255, 255) # Green #icol = (18, 0, 196, 36, 255, 255) # Yellow #icol = (89, 0, 0, 125, 255, 255) # Blue #icol = (0, 100, 80, 10, 255, 255) # Red cv2.namedWindow('colorTest') # Lower range colour sliders. cv2.createTrackbar('lowHue', 'colorTest', icol[0], 255, nothing) cv2.createTrackbar('lowSat', 'colorTest', icol[1], 255, nothing) cv2.createTrackbar('lowVal', 'colorTest', icol[2], 255, nothing) # Higher range colour sliders. cv2.createTrackbar('highHue', 'colorTest', icol[3], 255, nothing) cv2.createTrackbar('highSat', 'colorTest', icol[4], 255, nothing) cv2.createTrackbar('highVal', 'colorTest', icol[5], 255, nothing) # Raspberry pi file path example. #frame = cv2.imread('/home/pi/python3/opencv/color-test/colour-circles-test.jpg') # Windows file path example. frame = cv2.imread('colour-circles-test.jpg') while True: # Get HSV values from the GUI sliders. lowHue = cv2.getTrackbarPos('lowHue', 'colorTest') lowSat = cv2.getTrackbarPos('lowSat', 'colorTest') lowVal = cv2.getTrackbarPos('lowVal', 'colorTest') highHue = cv2.getTrackbarPos('highHue', 'colorTest') highSat = cv2.getTrackbarPos('highSat', 'colorTest') highVal = cv2.getTrackbarPos('highVal', 'colorTest') # Show the original image. cv2.imshow('frame', frame) # Blur methods available, comment or uncomment to try different blur methods. frameBGR = cv2.GaussianBlur(frame, (7, 7), 0) #frameBGR = cv2.medianBlur(frameBGR, 7) #frameBGR = cv2.bilateralFilter(frameBGR, 15 ,75, 75) """kernal = np.ones((15, 15), np.float32)/255 frameBGR = cv2.filter2D(frameBGR, -1, kernal)""" # Show blurred image. cv2.imshow('blurred', frameBGR) # HSV (Hue, Saturation, Value). # Convert the frame to HSV colour model. hsv = cv2.cvtColor(frameBGR, cv2.COLOR_BGR2HSV) # HSV values to define a colour range. colorLow = np.array([lowHue,lowSat,lowVal]) colorHigh = np.array([highHue,highSat,highVal]) mask = cv2.inRange(hsv, colorLow, colorHigh) # Show the first mask cv2.imshow('mask-plain', mask) kernal = cv2.getStructuringElement(cv2.MORPH_ELLIPSE, (7, 7)) mask = cv2.morphologyEx(mask, cv2.MORPH_CLOSE, kernal) mask = cv2.morphologyEx(mask, cv2.MORPH_OPEN, kernal) # Show morphological transformation mask cv2.imshow('mask', mask) # Put mask over top of the original image. result = cv2.bitwise_and(frame, frame, mask = mask) # Show final output image cv2.imshow('colorTest', result) k = cv2.waitKey(5) & 0xFF if k == 27: break cv2.destroyAllWindows()
OpenCV is well documented, just Google an OpenCV method you are not familiar with to find out more about it.
The OpenCV color detection code is performing the following steps:
- Load in the sample image.
- Get the HSV values from the GUI sliders.
- Display the original sample image on the OS desktop.
- Blur the sample image and display on the desktop.
- Convert the blurred image to the HSV colour model.
- Create a mask from values in the range selected with the sliders. Then show the resulting mask.
- Cleanup the mask by using Morphology Transformation functions. Then show the resulting Mask.
- Apply the last mask to the original image which will leave the colour of interest untouched.
- Finally, display the resulting image.
Experiment
Use the above code to experiment with different sample images. Try to isolate various elements within a sample image. Also, experiment with different blurring methods and try adjusting the blur values to see any difference this makes. OpenCV article about smoothing images can is here.
frameBGR = cv2.GaussianBlur(frame, (15, 15), 0)
frameBGR = cv2.medianBlur(frame, 7)
frameBGR = cv2.bilateralFilter(frame, 15 ,75, 75)

kernal = np.ones((15, 15), np.float32)/255
frameBGR = cv2.filter2D(frame, -1, kernal)
Morphological Transformations
Morphological Transformation operations used in the example code helped fill holes in the round coloured balls I tried to filter. Dark shadows and lamp spots can cause a less than perfect image mask when using colour filtering alone. To find out more about Morphological Transformations, visit the OpenCV documentation here.
kernal = cv2.getStructuringElement(cv2.MORPH_ELLIPSE, (30, 30))
mask = cv2.morphologyEx(mask, cv2.MORPH_CLOSE, kernal)
mask = cv2.morphologyEx(mask, cv2.MORPH_OPEN, kernal)
The ellipse size will depend on the size of the spots you want to close or open.
What Next
If you have a compatible webcam, try the video capture version of the Python code. Find the link to the code under Resources below.
The example code featured is likely the minimum you want to start with. However, detecting objects more complex than round balls will likely need a more complex coding solution.
With the OpenCV example code covered in this article, the code cannot yet track an AOI (area of interest) within an image. So this is what I will be addressing in the next OpenCV article.
![]()
Object Detection and Tracking with OpenCV and Python – Link.
Pi Camera Video Capture with OpenCV and Python Multithreading – Link.
Having the ability to track an AOI in a video stream, for instance, we can use the information to set a waypoint for a robot to travel. A waypoint, for example, could be a charging station for a robot to dock on. Use the comment section if you have other ideas of what an AOI could be.
Resources
- Python 3+ for Windows download – Link.
- Wrapper package for OpenCV Python bindings (used for Windows platform) – Link.
- Using the Raspberry Pi Camera with OpenCV – Link.
- Python code and test image GitHub page – Link.
Buying Featured Items
The purchase price is going to vary greatly depending on how quickly you want the items. Therefore shop around checking out Amazon, Ebay, Adafruit and local electronic stores.
Banggood:
- No Driver required Mini USB Camera For Raspberry Pi – Link.
UK Searches:
UK Amazon:
US Searches:
US Amazon:
On Closing
I hope you find this article useful – OpenCV Color Detection and Filtering with Python, please like and share.
2 thoughts on “OpenCV Color Detection and Filtering with Python”
Comments are closed.