If you’re a beginner seller and looking forward to creating your very first product listing, then this article is for you.
Creating the perfect product listing is the essential part of success on Amazon. But if you’re a beginner, you may find it a bit challenging. Don’t worry; creating your very first product listing is much easier than you think, and we’ll discuss everything you need to know in this article.
You need to prepare a few things ahead of creating a product listing. Make sure that you have all the required information. I’m going to take you through three critical things.
- Product ID
- Keywords for your Listings
- Product Images
Product ID
If you’re selling a product that’s never been sold before on Amazon, then you need something called product ID. It’s a unique identifier for commercial products. UPC barcodes, EAN are all variations of Global Trade Item Numbers or GTINs.
Many websites sell GTINs for a low price. But, these are not allowed by Amazon. If you do buy it from these sites, there is a risk that your products might get suspended because Amazon might think your products are fraudulent. Amazon suggests a GS1 platform to buy UPCs from, or you can also buy it from legitimate GS1 sellers.
Keywords for your Product Listing
Keywords are one of the important factor that increases your chances of being visible to your potential customers.
Researching keywords can be a bit of a pain. So this is where we come in. With SellerApp’s powerful tools, you can research the right sort of keywords for your product listing based on CPC, search volume, relevancy, etc.
We’ve already created a detailed video on how to research keywords for your listings on Amazon using SellerApp:
You need a unique set of keywords for product title, bullet points, description, and backend search terms.
Product Images
Make sure you have the right set of images for your product. Images can influence the buying decision of shoppers to a large extent.
So you need to make sure that you have the right images that put your product in the best light possible.
- Ensure the images are of High-quality
- Capture product in Different angles
- Portray lifestyle images in different use case scenarios
- Highlight all the USPs.
- Use Infographics to show how your product is unique from your competitors.
How to Create Product Listing on Amazon?
Now you have everything you need, let’s have a look at how to create a product listing on Amazon
- Sign in to Amazon Seller Central
- Add a New Product or Select Existing Product
- Select your product listing Category & Sub-Categories
- Filling out Product Listing Information (Vital-Info)
- Product Listing Information (Variations)
- Select your Fulfillment Channel
- Upload Product Images
- Add Product Description
- Add Keywords
Step 1: Sign in to Amazon Seller Central
Sign in to Amazon Seller Central and select Add a product under the inventory drop-down menu.

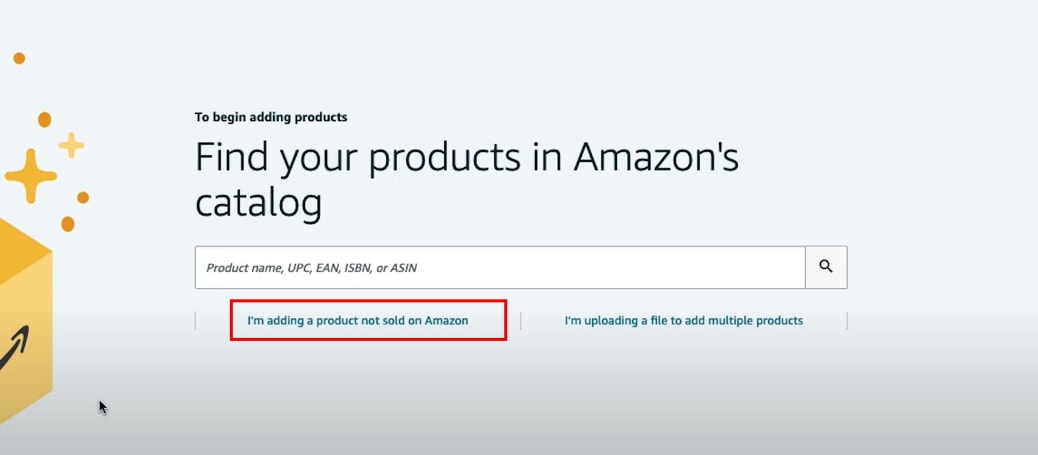
Step 2: Add a new product or Select a product that’s already on Amazon.
Here you see two different options. The first one is if you’re planning to sell a product that already exists on Amazon, then you can choose the first option, which is to find your products in Amazon’s catalog.
If you have any Product ID like EPC or ISBN, or ASIN number, you can type it in the search box.
If you are planning to sell a product that’s not sold on Amazon then click on ‘I’m adding a product not sold on Amazon’
Step 3: Select your Product listing Category and Sub-categories
Once you click on the second option, you’ll be taken to a page with categories to choose from. if you feel like your category might qualify for two different categories, then the wisest thing to do would be to look at where the existing sellers are listed and look at their corresponding daily sales and revenue whatever category is making the most amount of sales, I would say choose that specific category.
You can use the SellerApp Chrome extension to find out the daily amount of product sales and revenue per seller.
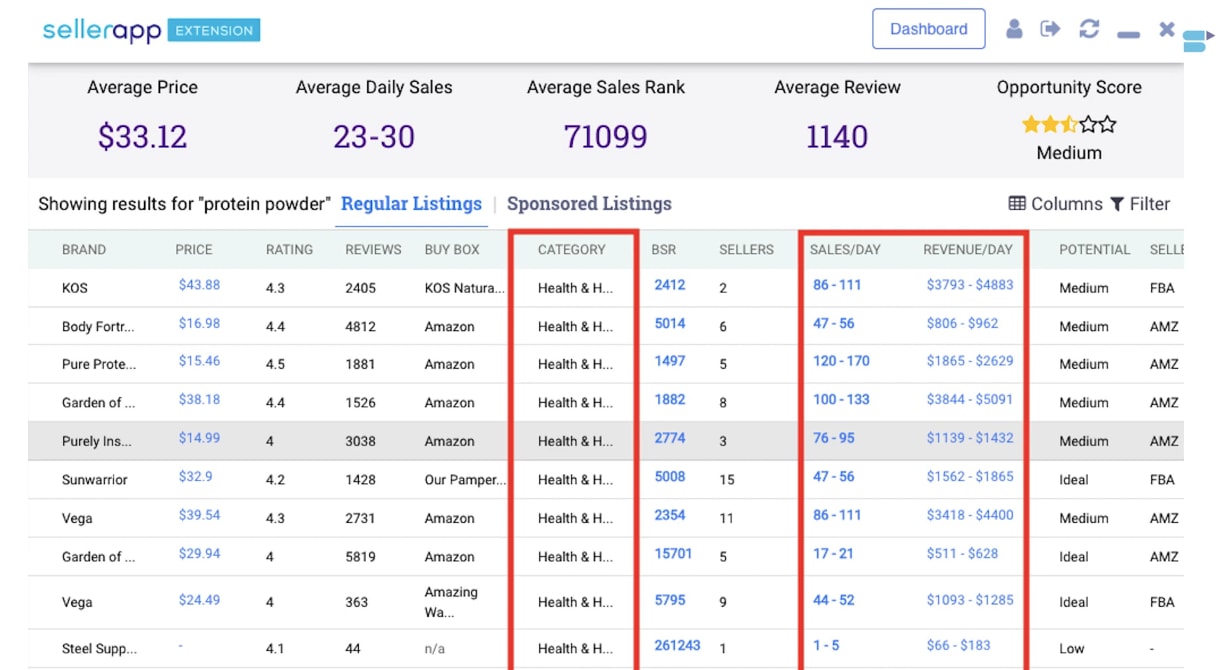
For Example:
I have already chosen the product, which is ‘whey protein powder.’
and it’s the best seller in its niche.
Let’s figure out what category it’s listed under.
Health and Household > Sports & Nutrition > Protein Powders > Whey
Step 4: Filling out your product listing Information (Vital Info)
Once you’ve selected the correct category, you’ll be taken to the most essential part of the process, which is filling out the listing information of your new product.
This section is divided into different tabs, and the first one is vital info.
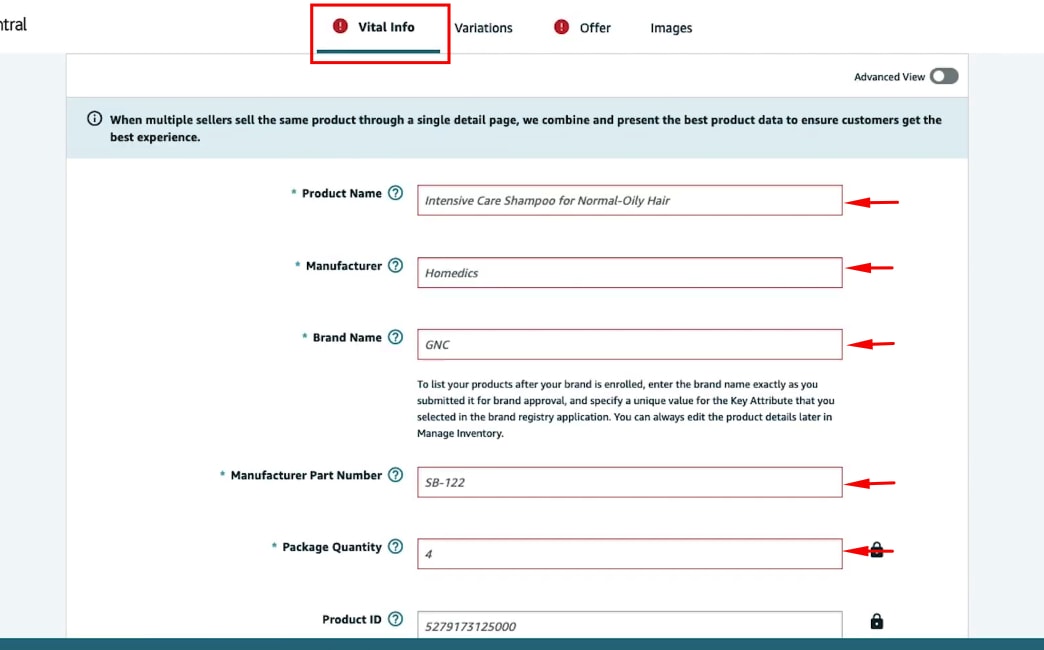
The Vital tab contains one of the essential parts of your product listing. which is your product name, manufacturer, brand name, manufactures part number, package quantity, product id, and more.
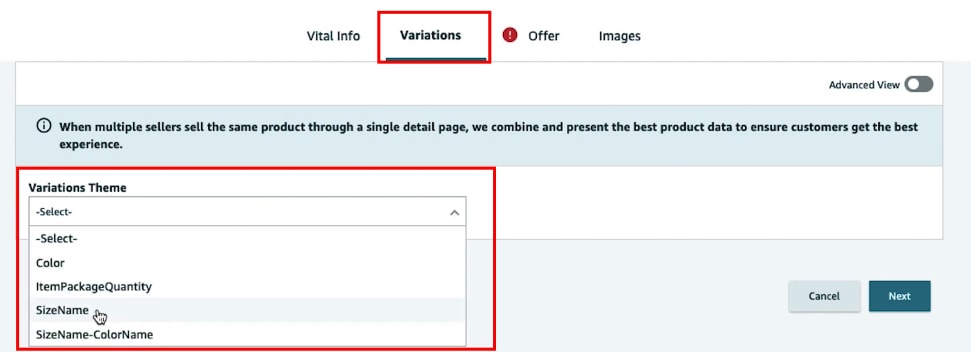
Step 5 – Filling out your listing Information (Variations)
If you have different variations for the same product that you’re selling. based on size or color or items, then you can choose variations. You can create a parent ASIN and then list all the child ASINs under it.
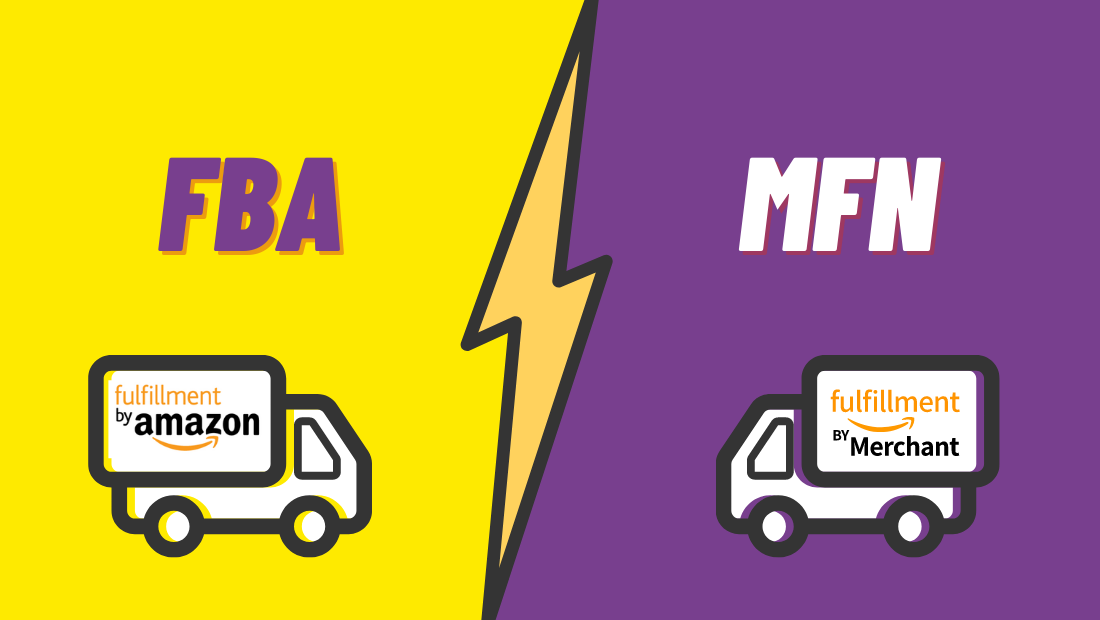
Step 6 – Select Your Fulfillment Channel
There are two options in the fulfillment channel: the first one is motion fulfills, and Amazon fulfills the second one. If the seller is fulfilling the orders, package everything, then it is merchant fulfilled.
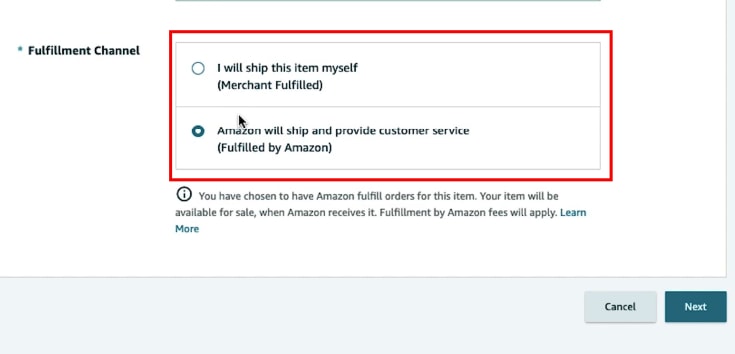
If Amazon is taking care of packaging, shipping, customer service, everything, then it is fulfilled by Amazon.
Step 7 – Upload your Product Images
Move on to the image section. This is where you can upload all of your images. It is recommended to have at least five to six images, and Amazon allows up to ten images. it would help if you made sure that images are of excellent high quality and high resolution.
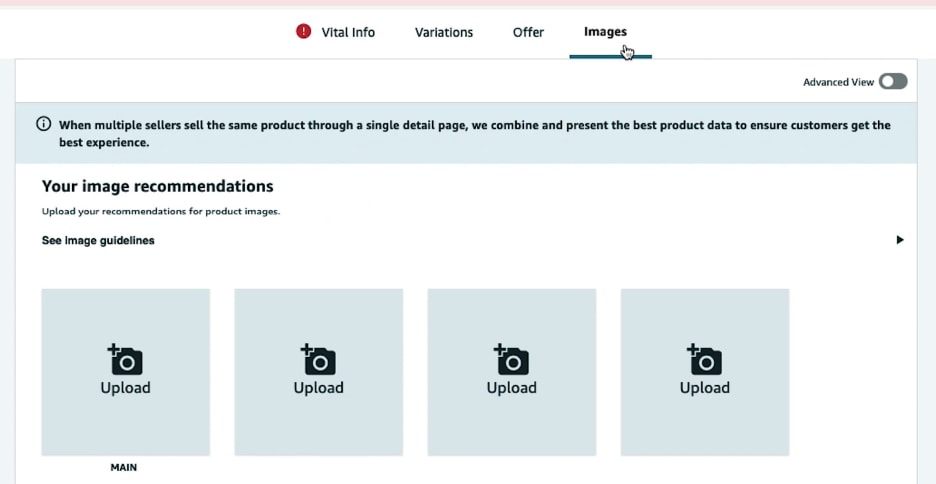
You can have one product image as a thumbnail image, and the rest can be product detail images, infographics, and lifestyle images.
Best Practice
- Images should be at least 1000px on the longes side & 500px on the shorter side
- Ensure your product occupies 85% of the space on the image.
- Don’t add any watermarks or logos on the product images
Once you uploaded all the images, click on advanced view. It will show you multiple different options that were hidden.
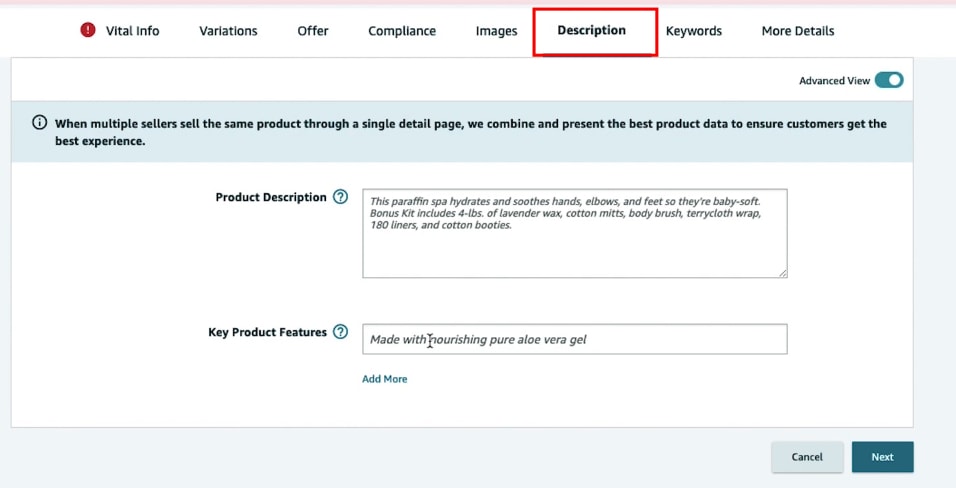
Step 8 – Add Product Description
The description is super important as you will be entering your bullet points and product description.
- You’re allowed to have five bullet points to maximize your visibility
- Add your keywords in the description
Create an attractive HTML product description for your Amazon product for free with the Amazon Product description editor. No HTML knowledge is needed!
Step 9 – Add Keywords
Keywords are another critical part of creating a successful product listing. Tools like SellerApp can help you find the perfect keywords for your product.
The first one is search terms which are usually referred to as backend keywords. If you have any synonyms or any other keywords that you’d like to put into your listing, you can add those search terms here.
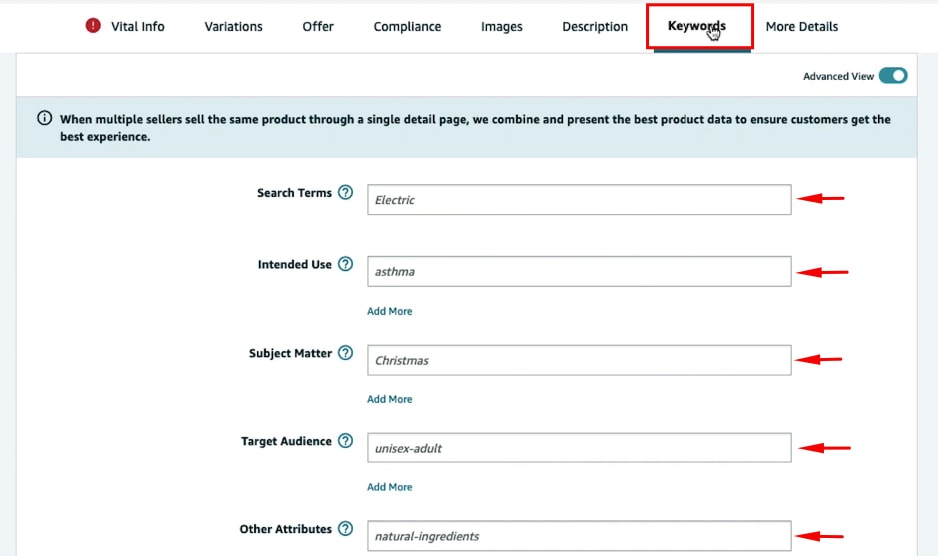
That’s it click Save and finish, and you have created your product listing.
Amazon product listing Restrictions
Now that you’ve created your very first Product listing, make sure you avoid the following
- Don’t use terms like best, free, buy one get one or subjective terms like cute, cool, etc.,
- Stay away from trademark words & Amazon words like special amazon deals.
- Don’t do keyword stuffing because neither amazon, not the shoppers like it
- Incomplete listing will be suppressed, fill out all the information required.
- Don’t use time-sensitive information, like the best product of the year.
- Don’t put shipping details on the description, like free shipping or the shipping duration.
Final Words
Let’s summarize you need to have the following information ahead of creating a product listing on Amazon, like your product ID, keywords, and images. Then you will sign in to your seller central account, choose to add a product on the inventory drop-down menu in the seller central, select the option to add a product that’s not sold on Amazon before, and fill out all your product details and select the appropriate category & subcategories.
You can choose an FBA offer if you want Amazon to fulfill your orders. I hope you found this article helpful.

9 Comments
Vipin
Very helpful! Thanks for the article.
Aidan John
Thanks for sharing such an amazing article.
Avery
This post was extremely interesting.
Ethan
Your blog was always useful.
Thank You
Zofia Martin
I think this is an informative post and it is very useful and knowledgeable.
Thank you!
Robertwidly
Nice article. This provides product listing strategies on Amazon to users and also new Amazon sellers.